
Discovering the Faroe Islands
- Alyce Bender

- Oct 30, 2018
- 10 min read

Moody mountains rising from the cold North Atlantic waters, the Faroe Islands are a photographic destination hot spot. Over the last several years, tourism has been rapidly growing within this small country (self-governing but "owned" by Denmark) with photographers and birders clamoring to visit before it becomes overrun like Iceland.
There is good reason for this, as, unlike Iceland, the Faroes are not set up to accommodate large populations of tourists. The roads are narrow, many only one lane, sandwiched between the side of a mountain and a cliff edge drop off. Choices of accommodations are growing as more and more Faroese open their homes up as rentals on platforms like AirBnB. Slowly, the local government and land owners are developing trails to the most popular of locations while many are still just sheep trails accentuated by the random hiker.
Location tip: Hire a guide or go with a small photography oriented group. Not only will they have insider knowledge but it helps keep the Faroe Islands visitor friendly for further exploration.
Also, as mentioned in the opening statement, the Faroe Islands are subject to all sorts of inclement weather with over 200 days of rain or snow each year. Strong winds can be present at any time during the year and often pose a significant danger to those who let their guard down while driving or hiking. For example, on my visit there this month, I had my filter case ripped from my gloved hand as I tried to protect my camera equipment from the sudden strengthening of the wind ahead of a storm front that was bearing down on us. The case almost went into the ocean and at least one of my filters popped out and did go into the drink. But it was better than loosing my grip on my tripod and having everything tumble over!
Photo tip: Bring a super stable tripod, preferably with a weight hammock. In high winds, like I experienced many times, hanging a bag from the center hook only added to the vibration and movement of the camera setup.

Don't let these facts put you off visiting though! These challenges just make the journey that much more of an adventure. I highly suggest going with a knowledgeable guide who is either a local or long time visitor of the islands. Not only will they know how to predict the weather patterns best but they will also be comfortable driving in such adverse conditions, allowing you to just concentrate on making the most of the changing scenes.
As much as I typically travel solo when exploring new locations, the Faroe Islands were first brought to my attention by the amazing Photog Adventure duo, Aaron and Brendon, who were partnering with James Kelly, of James Kelly Photography, of Scotland. James' local knowledge of the Faroe Islands comes from his extensive excursions to the islands over the last six years. Together, Photog Adventures and James were offering a week long photographic adventure in September, focusing on landscape photography and chasing the potential for Aurora Borealis, or the Northern Lights. So I signed up, went, fell in love with the islands, and then returned again this month on one of James' own adventure trips where he happened to have a last minute cancellation that opened a seat for me.
Location tip: Take a look at Photog Adventures and James Kelly's trip offerings. They have some of the most affordable pricing for these adventures in the Faroe islands and James has by far more local knowledge than most tour leaders currently offering photography trips and workshops to the Faroes.
Because I was able to visit twice in two months, I feel I witnessed a good variety of weather. From unseasonably warm and sunny days in September to early snowfall and hurricane force winds in October, the islands showed me so many different moods that sometimes all I could do was sit back and watch in awe.

The general rule of thumb when thinking of locations to shoot in the Faroe Islands always seems to be that everything is an hour away. Just seems to be how it happens. Most locations can be driven to through a series of underwater or cross-mountain tunnels, while a few of the islands require a ferry or helicopter ride. We only used the ferries during my visits.
Island of Streymoy
Tórshavn
Capital and largest city in the Faroe Islands, Tórshavn is where the majority of the hotels, restaurants, and other tourist related services are located. The AirBnB our group stayed at this month (October) was located on the outskirts of Tórshavn, allowing for easy access to groceries and even some great sunrise locations. The main ferry port is also located in the city so its a good place to base yourself out of when exploring the islands.
Location tip: The airport is not located in the city and is actually on an separate island, Vágar, connected to Streymoy by tunnel.
Sunrise is also more of a tie than an actual phenomenon in the Faroes. Going back to the 200+ days of rain and snow, the likelihood of getting a full sunrise is slim. However, when you do get that moment of break in the cloud when the sun is able to come through, you want to make sure you are in a position to capture it!
Here we were on the coast in Tórshavn, waiting for the break in the clouds to happen, when a storm came in from behind us. This is the location of the filter story from above. Still, a long exposure using a polarizing filter and a six stop neutral density filter, produced this image which is strong even without the sunburst of a typical sunrise image.

Route 50
Leaving Tórshavn, you have two options when heading north. The first is to take the newer low road that skirts the ocean and utilizes tunnels through the mountains. Scenic as pretty much all roads in the Faroes are, this one is typically busy with traffic in and out of the city. Or you can take the older mountain road that was the main route before they built the tunnel.

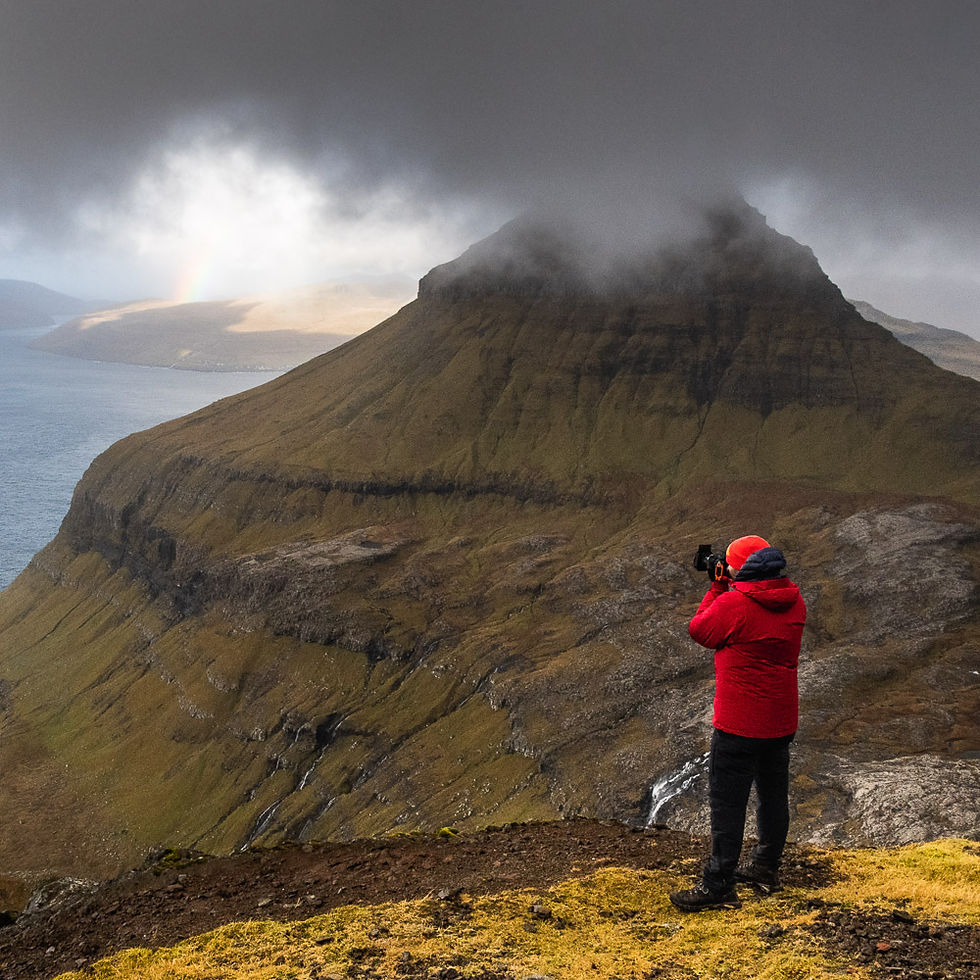
This route takes you up and along the tops of the mountains that dominate this landscape. Its here that high winds can become hazardous to even the most mundane of drives, so watch the weather reports before attempting this route.

There are a few pull off along the way and two roads off Route 50. The first road takes you down towards Norðradalur while the second leads to the precipice of Sornfelli. The road to Sornfelli twists and turns sharply back and forth upward along the outer crust of the mountain in a single lane outlined by snow poles that stand over 10 feet high in places.

Location tip: Those who suffer from motion sickness might have a hard time with sections of the roads across the islands depending on how sensitive one is to winding roads. Those with fears surrounding heights also may have some issues as many of the locations are at the edge of sea or mountain cliffs.

This had to be one of my favorite locations in all of the islands though. The weather up there moved quickly at the whim of the winds. Sunbeams danced along the neighboring mountains before being overtaken by more clouds which transformed into microbursts before light crept back through, projecting rainbows on the still falling rain.

Not only was this a continuously changing and challenging area to shoot, but it was also an exhilarating spot. Sometimes you just had to leave the camera in the van and revel in the power of the wind that kept you struggling to stand, or at times, even breath. Its literally the view that can take your breath away!

Island of Vágar
Drangarnir
Long story short, the challenging hike is a feat in and of itself. If you come away with no image but complete the hike you will still have an amazing accomplishment under your belt. But images are always the goal, right?

A rather death-defying two and a half hour hike on narrow, slippery, sheep trails is what is required to photograph this rock monolith. While not physically challenging, per se, the challenge comes from the mental fortitude required to walk that long on paths that could send you down into the chilling waters of the North Atlantic at any point if you were to have a misstep. Slow and steady is best for this location. If trying to capture sunset out there, see if you can arrange for a boat to pick you up so you are not having to make the return trek in the dark.

Photo tip: Remember to look back the way you came. Many times the landscape you just crossed can be as stunning as your intended destination.

Location tip: Due to the changing weather, steep cliffs, and lack of facilities it is now required that hikers have a guide for this trail. There have been several deaths in the last few years and the land owner has started requiring guides for everyone's safety. If not traveling with a group, contact hiking.fo for assistance in locating a guide for this hike.

Once you arrive out at the cliff end that overlooks Drangarnir, there are several locations to photograph the arch way from. If the tide is low and ocean "calm," you may be able to find a way onto the seabed rocks for an ocean level view. Otherwise venture along the cliff slope further above for various views at different elevations, some with foreground elements or others that isolate the formation in the sea.
Photo tip: If you have clouds or really choppy ocean, try using neutral density filters for a long exposure. This will smooth out the clouds and ocean, taking away some of the busy distraction around your main subject. Using a graduated neutral density filter can also lend more drama to the sky by darkening the clouds and balancing out the scene.

Múlafossur
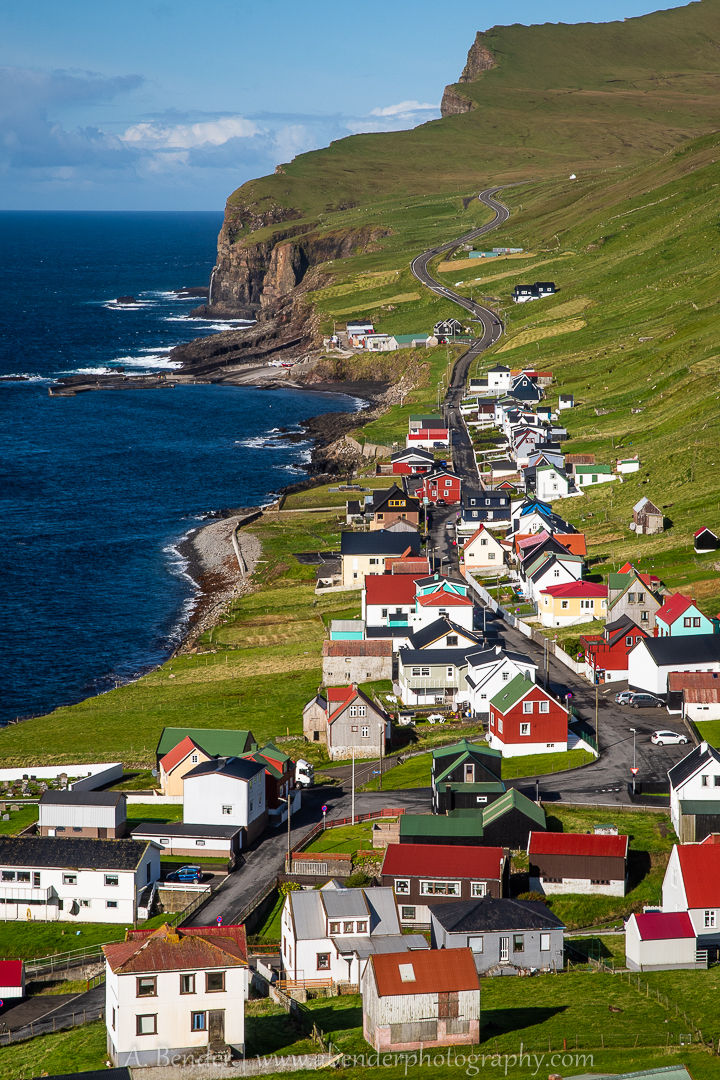
Not far from Drangarnir, the way the crow flies, is the tiny village of Gasadalur. This town has the distinction of becoming the iconic image of the Faroe Islands. With less than 20 inhabitants, this tiny village sits above the famous Múlafossur waterfall. Unfortunately, as beautiful as the area is, there are very few vantage points from which to view the falls. This can make it hard to get a unique composition. Be very careful if you venture down the stairs to the seabed. Not only are they almost vertical and tend to be slippery due to the high levels of moisture in the area, but sneaker waves are common and can pull a person right off the rocky ledge.

Location tip: This was the only place I actually saw full sized buses offloading tourists. Go early morning or late evening to avoid the crowds.

Island of Kalsoy
On the northern half of the island chain sits the island of Kalsoy. This is one of the islands that must be accessed by ferry. Several depart Klaksvík each day, so its just a matter of choosing how long and what type of light you are wanting to try to catch as to which you take out there.

Location tip: Another very sparsely populated area, there is only a very small "cafe" in the far village if you need any food or snacks while there, so stock up before getting on the ferry.

The main draw for photographers to the island of Kalsoy is the cliff view and Kallur Lighthouse. Another muddy sheep trail leads seekers up a steep slope and across the slanted sheep fields out to the lighthouse. This hike only takes about an hour and a half each way, and, while it would suck to slip here, you don't have to worry about falling into the ocean except when you reach the very end near the lighthouse. So, to me, this was a much easier hike.

Location tip: These trails are not for those who have mobility issues. Please be honestly aware of your fitness level before attempting any hikes in the Faroe Islands. Help is rarely close by and cell phone signal is patchy, especially on the outlying islands.
Gear tip: Get yourself a pair of trekking poles and learn how to use them properly before arriving in the Faroes. They make a huge difference, even for those without any sort of physical ailment. They help stabilize and act as a third and fourth point of contact when climbing uphill and help take pressure off the knees when coming downhill. With gear bags filled with thousands of dollars worth of equipment, trekking poles protect not only you but your investments when exploring by foot.

Island of Suðuroy

At the other end of the archipelago, far to the south, lies Suðuroy. A two hour ferry ride from Tórshavn, this island is infrequently (at least at the time of writing) visited by tourists and photographers. Thankfully, James is very familiar with this island as his in-laws live here. Just another reason to go with a guide familiar with the country.

Here there is everything from the high vertical cliffs to sandy coves and small fishing harbors. Regardless of the weather, there is something to shoot. When I first visited in September we had an amazingly sunny day when we visited Suðuroy. Able to explore much of the islands photographic spots, we did as the old phrase states and "made hay while the sun shined."

Upon returning in October, we were greeted with completely cloud covered in cloud with rain and high winds. It was a challenge to find a suitable shooting location that would protect us from the worst of the elements while still giving us an opportunity to shoot. With experience in hand, James was able to find a harbor in which we were able to photograph the powerful waves and the secretive seals that were using the area to shelter from the storm. I choose to try something a bit different and created a long exposure image with the focus on the solid geometric lines of the concrete pier in juxtaposition to the fluid waves and thick mist that encircled it.

Sailing back at sunset gave me the opportunity to capture images of the islands at a distance. Passing the islands of Stóra Dímun and Litla Dímun with golden light filtering through stormy clouds was a special moment.

As a whole, the Faroe Islands are stark and harsh environment for shooting and exploring. However, with a bit of prep work, the proper gear, and keeping in mind that safety should always be top priority, these islands can deliver amazing images at any given time.
Additional images from around the Faroe Islands


Comments